
Quick access to today's page: http://goo.gl/QST5zx

Today I am here to help you get a quick introduction to Chromebooks and Google tools. Please try things as we go along, ask questions and most importantly, have fun with it! If you find this information useful, please bookmark this page so you can return back to it. After I leave, if you have any other questions, you are welcome to contact me. All of my information is on the front page.
Getting orientated to your Chromebook
For the most part, your Chromebook operates much like any other computer. The primary difference is that it has very little storage and you cannot load programs on it. With the exception of running Java-based programs, your Chromebook can do anything that can be done on the Internet.
There are a few keys that are unique to your Chromebook. Below is what is called a Thinglink. If you move your mouse over the picture below, you will see different-colored hover points where you can get more information. With Thinglinks you can put in images, links, videos, and more. Educators can create free Thinglink accounts here.
There are a few keys that are unique to your Chromebook. Below is what is called a Thinglink. If you move your mouse over the picture below, you will see different-colored hover points where you can get more information. With Thinglinks you can put in images, links, videos, and more. Educators can create free Thinglink accounts here.
For more tips, Google Gooru is a group that makes daily emails and tutorial videos for all sorts of things Google related.
http://www.thegooru.com/ Hint: When searching for help online, check the date a post or video was made. If it is more than 18 months old it is likely out of date in the land of Google.
|

|
Consider the terminology you will use with your students. This is another form of academic language. The more consistent you and your colleagues are, the easier time students will have. The Golden Valley Instructional Leadership Team has put together a technology glossary that we use with our teachers and students.
|
|
How will students know when to use Chromebooks? Do you have a sign to flip? What will you do when you want their attention?
Contemplate school-wide terminology like "courtesy mode," which means Chromebook screens are at 45 degree angles, mouths are closed, and ears are open. Or a stoplight signal: Green = Go, Yellow = Screens at 45, Red = screens closed. |

Chromebooks closed!
|
|
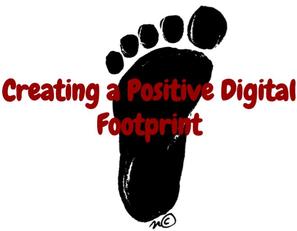
Creating a favorable online presence is important. Nothing is private on the Internet and it lives there forever (for all intents and purposes). It is important to convey this to students early and often. Personally, I spend a couple of days talking about digital citizenship, Creative Commons, copyright, email etiquette, and other topics of this nature. I find that taking the time at the beginning of the school year makes a difference all year long. Even when students hear it in multiple classes it reinforces how important the topic is.
|
Here are some great resources to consider and use while you are teaching your kids to practice safe and responsible Netiquette.
- Common Sense Media's Digital Literacy & Citizenship Classroom Curriculum
- Everyone on the Internet is a Real Person -- a presentation adapted from a Buzzfeed article and illustration.
- A story from 2012 on a 22-year-old woman fired from Cold Stone Creamery in Turlock for disparaging comments about President Obama and saying she hopes he is assassinated.
- A story from July 2015 about a student who was expelled and lost his scholarship because of racist and sexual tweets (Another article from ESPN and another). While the incident happened in 2012, it went to the Supreme Court, and this month they declined to hear his case.
- Digital Citizenship one liners compiled by Alice Keeler with a great graphic by Sylvia Duckworth.
Above all, teach students to THINK!

|
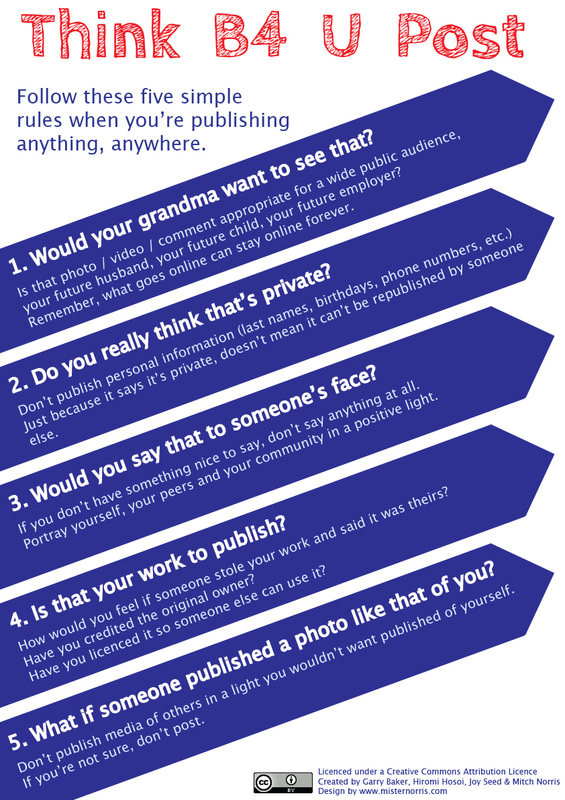
Think B4 U Post was created by Mitchell Norris under a Creative Commons license. Click the image to go to the page.
|


Your Google Drive is where you can get to all of your files and store them. Your files are stored in the cloud, which means they are accessible anywhere and anytime you have Internet access.
I think it is advisable to have your Google Drive back-up to your computer at school and at home. That way if there is ever a failure of Internet, you can still use your files. You can download your Google Drive by going to this website. At work you may need permission of your network administrator in order to download Google Drive. Anytime any of your computers that have Google Drive downloaded are connected to the Internet your files will automatically update to the latest version. No more forgetting flash drives!
|
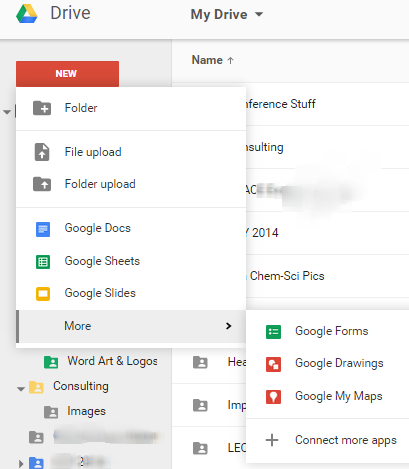
The red NEW button is your guide to most Google files. Don't miss the "More" menu where you can see Google Forms and Google Maps, both valuable classroom tools.
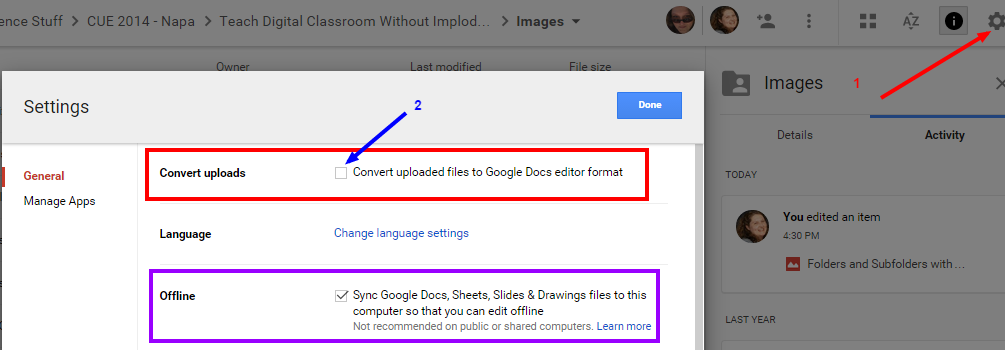
Sometimes you will want to upload your files to be stored on your Google Drive either to stay organized or to keep the files updated to the latest versions. File upload and Folder Upload are useful for that. Sometimes you may want to convert your files to a Google Document. In the image below you can see where those settings are as well as making your files available offline. This is so you can use your Chromebook when there is no Internet access. |
|
|
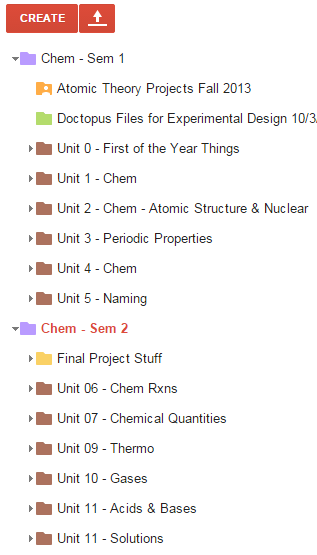
Tip #1 - No Orphan Files Use folders
And folders within folders Trick Google to organizing things your way by putting a number or an alphabet letter in front of the file name. |
|
|
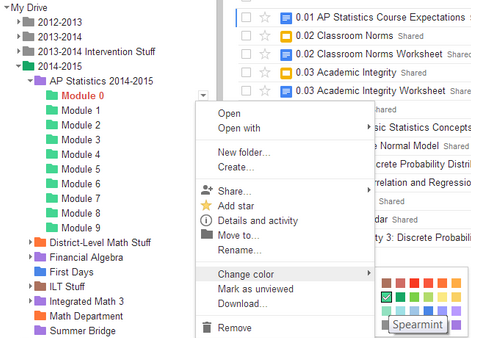
Tip #2 - Use ColorGoogle makes it very easy to add color to your folders to help you stay organized and brighten your day.
Your brain recognizes color faster than words. |
Tip #3 - Use a Naming Convention
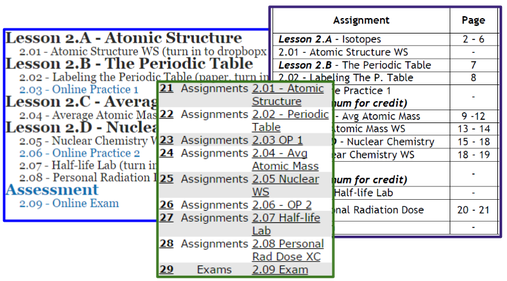
- Consider including year, course, unit, section, assignment number, etc.
- Use everywhere
- Gradebook Programs (Aeries)
- Assignment Headers
- Website
- Have students use it, too!
I use a Unit-Assignment number combo
- 2.03 is Unit 2, Assignment 3
The letters refer to Lecture or class activities that are not graded
- 2.A is a lecture on Atomic Structure

|
You can store a file in multiple folders without making copies.
Shift-z is the keyboard combination you will use. Alice Keeler gives detailed instructions with pictures on her website. |

|
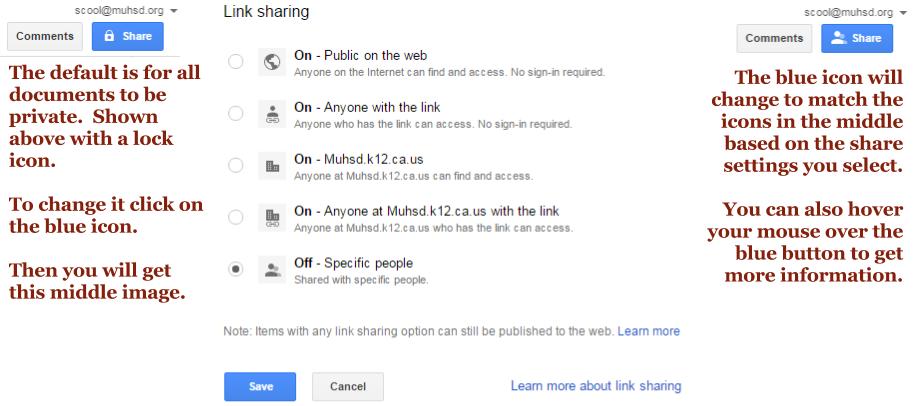
One of the most powerful capabilities that is pretty unique to Google is the ability to share folders in your Google Drive and as well as individual files.
This makes for more efficient workplace as co-workers can collaborate on a single document. Even more importantly, students can do the same. It is critical understand the different types of sharing permissions and how to control them. |
|
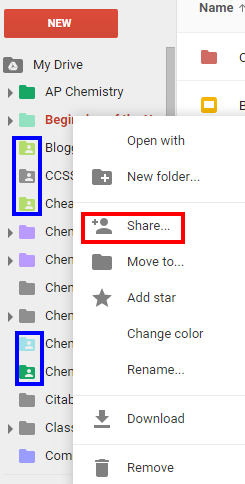
When you are in Google Drive, if you right click on a file folder you can share it with someone else. This is done by using their email address.
The red box shows what you select. The blue boxes show how the icon appears when you have shared a folder. Below, this is how individual files appear when they are shared with at least one more person. Note, when you share a folder, any document you create or move in there is automatically shared with the other people. Google reminds of you this frequently. Let's practice creating and sharing folders! 
|
|
|
|
|


Google Docs is analogous to Microsoft Word. You will find that most of the features are exactly the same as well as the keyboard commands, like ctrl-c for copying.
One feature that Google Docs does not have is the ability to make columns. To get around that I create a table and make the borders invisible.
Click on this shared Google Document and follow the instructions.
Create a new Google Doc to play with and practice sharing it with a friend.
One feature that Google Docs does not have is the ability to make columns. To get around that I create a table and make the borders invisible.
Click on this shared Google Document and follow the instructions.
Create a new Google Doc to play with and practice sharing it with a friend.
Sheets is akin to MS Excel. Just like docs, it has most of the same features. The majority of the formulas are identical and it will do pivot tables. One of the nice features is you can do your work in Sheets and then turn it into an Excel document if needed.
Click on this shared Google Sheet and follow the instructions.
I find Sheets to be really useful for data collection as well as class discussion. Students can each have their own cell to type in.
Click on this shared Google Sheet and follow the instructions.
I find Sheets to be really useful for data collection as well as class discussion. Students can each have their own cell to type in.
Slides has much of the same features as PowerPoint. Just like Docs and Sheets you will find most of the commands and other things to be exactly the same.
The slide templates are kind of limiting and boring after a while, but just like for PowerPoint, there are lots of template galleries online (Slides Carnival is one) where you can find more variety.
One real limitation is in the animation features. They are very limited in Slides. As a teacher I have very few presentations that are dependent on this animation (I have some that show electrons moving) so I just use my old PowerPoints. The benefit of converting my PowerPoints to slides is being able to easily share them as well as embed them on my webpage.
Click on this shared Google Slides and follow the instructions.
Forms are unique to Google and to me one of the most amazing features. Simply put, forms are survey tool. However, they can be used for so much more! I have used them to give quizzes, guided video watching, register people for trainings, conducted surveys, acted as signatures on a syllabus, exit slips, club minutes, data collection for science, phone number collection, sandwich ordering, opinion collection, and so much more!
Forms allow you to put in text, images, animated GIFs, and YouTube videos. You can put in blocks of text to read. There are various question types you can put in: text, paragraph text for longer answers, multiple choice, multiple select, chose from a list, Likert-scale building grids, and more!
Forms also has data validation, which means you can require answers to be a certain length or between certain numbers. It will also shuffle multiple choice answers and questions if needed.
The information from a form gets submitted to a spreadsheet (note that the icon looks similar to Sheets). You can then take that information and sort and manipulate it any way you need to.
Here you can try a sample form.
Click here & you can see the spreadsheet that it is making.
In this Google Form I was going to be absent from school and wanted my kids to refresh some content. I made a screencast (video) but how would I know the kids watched it? Well I put questions in the video and made them record their answers in the Google Form. One student was upset when he was making up the assignment because the questions were not on the page. I pointed out that he needed to watch the video to get the questions!
There are lots of tutorials on Forms on YouTube. Just try and make sure you get nothing older than 2014 for the publish date. Google products change frequently and the older videos are outdated.

|
Google Add-ons can enhance your Google tools in many ways. There are add-ons that will grade quizzes for you (Flubaroo). Add-ons that will help with highlighting, accents (Easy accents), spelling and grammar (Verity Spell).
There are even add-ons that will turn off Google forms at certain times (Form Limiter) or eliminate choices as people pick (Choice Eliminator) them which would be great for class parties and supplies. |


|
|
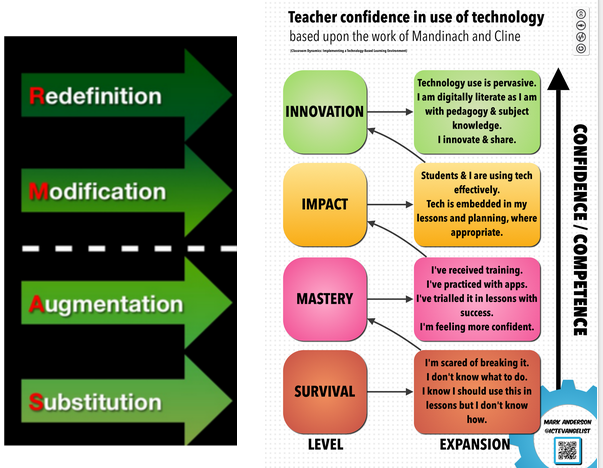
We are going to do a short introduction on the SAMR model using EDpuzzle.
EDpuzzle is a great tool because it allows you to take virtually ANY video on the Internet and add checks for understanding. You can monitor student progress, the amount of time they have spent on the videos and see how they are doing on various questions. Students can use their Google account if they have one. An email address is NOT needed, meaning it is great for students under 13. |
|
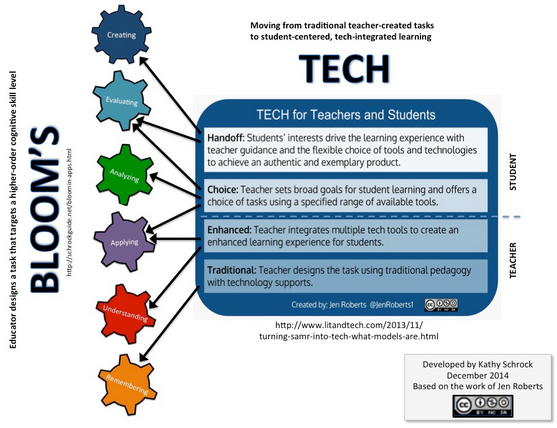
Borrowed from Kathy Schrock based on the work of Jen Roberts. Click on the image to be taken to the original post.
|


Distributing Assignments
There are 3 primary ways to distribute assignments:
1. Put a link on your webpage/calendar
- Students will have to make a copy of the assignment
- Students will have to "share" with you
- Puts the responsibility on the student
- Need a way to collect the assignment
|
2. Send a link via email
|
Doctopus Tutorial |
3. Use a 3rd party service to distribute
|
Google Classroom |
|
|
|